Saturday, November 11, 2017

Install package from private repository using composer from Bitbucket

By the use of composer is very simple to keep a package manager from different dependency in our projects. If you create your own package you must publish it in packagist in order composer can find it to install it. But if you want to have a private repository you must pay a fee in order to allow this from packagist.

So, can I have a private repository where composer can download my packages?
Yes, you can.

Per a request from my friends and family, I created this simple guide to install a package from a private repository that is hosted  in Bitbucket.


Overview


  1. Create SSH keys.
  2. Create my package.
  3. Add to my repository.
  4. Let's do it!


Create SSH

If you already have SSH private and public keys you can skip this step.
If not see Bitbucket guide.

1. Keep in hand the public key we will use it later.


My package

1. Lets create a package called "mypackage".


composer.json

{
    "name": "abelbm/mypackage",
    "autoload": {
        "psr-4": {
            "Abelbm\\Mypackage\\": "src"
        }
    }
}

test.php

namespace Abelbm\Mypackage;

class test {
    public function test(){
        echo "test";
    }
}


2. Add this package in a git repository in Bitbucket with the repository name "mypackage".
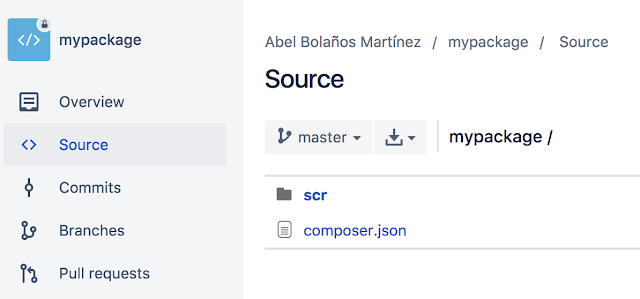


3. Push also to your repository the tag "v1.0".


git tag -a v1.0 -m "first version"
git push origin v1.0


4. Check the tag in your repository.


5. Go to the repository's settings.
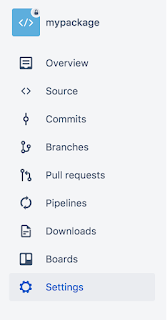


6. Navigate to the section "Access Keys".


7. Add your public key.
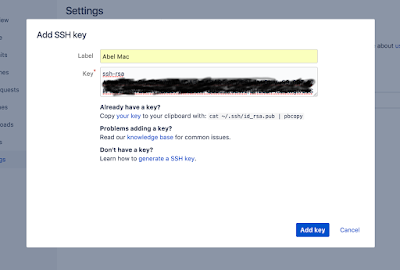


8. Done!


My project

1. Lets say we have our project called "myproject". Add a "composer.json" file.

composer.json

{
    "require": {
        "abelbm/mypackage": "1.0"
    },
    "repositories": [
        {
            "type": "vcs",
            "url":  "ENTER YOUR REPOSITORY PATH"
        }
    ]
}

2. Update the "url" with the SSH path of "mypackage". Example: git@bitbucket.org:abelbmartinez/mypackage.git


3. Using the terminal, navigate to "myproject" folder and run "composer" to install the package.


4. If everything is correct the package should install like a charm. Enjoy!


Sunday, October 15, 2017

Wordpress subdirectory domain in Nginx Ubuntu 16.04

        location /blog {
                root /var/www/html/wordpress/;

                access_log /var/log/nginx/blog.access.log;
                error_log /var/log/nginx/blog.error.log;

                location ~ \.php$ {
                        include snippets/fastcgi-php.conf;
                        fastcgi_pass unix:/run/php/php7.1-fpm.sock;
                }

        }

Wednesday, June 7, 2017

Wednesday, May 24, 2017

Bash to resize images using imageMagick

Taken the idea from unix.stackexchange.com
#!/bin/bash

files=*
W=800
H=600
SIZE_TEST="%[fx:(h>$H && w>$W)]"'\n'

for f in $files
do
    if [ $(identify -format "$SIZE_TEST" "$f") = 1 ]; then
      echo "Resize: $f"
      mogrify -resize ''"$W"x"$H"'' "$f"
    else
      echo "Do not resize: $f"
    fi
done

Tuesday, May 9, 2017

Quick code to test XML-RPC and SOAP 2 in PHP using Magento 1.x

XML-RPC


require_once 'app/Mage.php';

umask(0);
Mage::app();

$host = 'http://test.com';
$user = 'user';
$pass = 'pass';  

$client = new Zend_XmlRpc_Client($host.'/api/xmlrpc/');
$session = $client->call('login', array($user,$pass));

//call resource sales_order.info
$client->call('call', array($session, 'sales_order.info', array('10000001')));

$response = $client->getLastResponse();
$data = $response->getReturnValue();
var_dump($data);

$client->call('endSession', array($session)); 

SOAP 2


ini_set("soap.wsdl_cache_enabled", "0");//no cache

$host = 'http://test.com';
$user = 'user';
$pass = 'pass';  

$client = new SoapClient($host.'/api/v2_soap/?wsdl'); 
$sessionId = $client->login($user,$pass); 
 
//check available types
//$types = $client->__getTypes();
//var_dump($types);

//check available functions
//$functions = $client->__getFunctions();
//var_dump($functions);

$result = $client->salesOrderInfo($sessionId,'900687569'); 
var_dump($result);

Wednesday, April 19, 2017

Quick way to get a backtrace in PHP

Thanks to my friend Karel Lacaci, he send me this useful code.

// DEBUG BACKTRACE START ----------------------------
$file_paths = debug_backtrace();
foreach($file_paths AS $file_path) {
echo $file_path['file'] ;
echo 'Line: ' . $file_path['line'] ;
echo 'Function: ' . $file_path['function'] ;
echo 'Class: ' . $file_path['class'] ;
}
// DEBUG BACKTRACE END ---------------------------- 

Wednesday, March 8, 2017

Using inotify to detect file chages and send a notification by PHP

First of all we need to increase the inotify watchers, by default in Linux environments this value is very low. Check this Increase inotify watchers. Next let's create a watcher to always keep watching a folder(/temp/watch), save the change in a log(watchlog.log) and send an email by PHP. By default when inotify find a change the program just close until this is run again.
There is an option -d (demon but I haven't tested)
1. Create a folder called "watchlog"(/path/to/watchlog) and create the script to watch in the folder "/temp/watch"

inotify_folder.sh
#!/bin/bash

log_dir="log/"
log_file="watchlog.log"

while true
do
ts=$(date +"%C%y%m%d")
OUTPUT="$(inotifywait -r -e modify,create,delete --format '%T %:e %w%f' --timefmt '%c' /temp/watch  | awk '{print $4" "$6" "$7}' )"
#$4 time of change
#$6 event
#$7 file path
echo "${OUTPUT}" >> $log_dir$ts$log_file
php inotify_php.php $OUTPUT
done
inotifywait is using the parameter -r to watch recursive, if there are a lot of level and files inotify can take a while to start.
the paremter -e specify wich actions we want to watch, there more actions by default.
2. Create the folder /log in the same level to save the logs. 3. Create the script that will be call by the cron to check if the script 'inotify_folder.sh' is running

inotify_cron.sh
#!/bin/bash

running=`ps auxf | grep inotify_folder | grep -v grep`
if [ -z "$running" ]
then
    /bin/bash inotify_folder.sh
fi
4. Create the PHP script to send the email

  inotify_php.php
<?php
$receivers = array('user@mail.com');
$time = $argv[1];
$event = $argv[2];
$file = $argv[3];

foreach($receivers as $receive){
	mail($receive,'Alert on file '.$file.' with a '.$event,$event.' '.$file);
}

5. Set a cron to check every one minute
*/1 * * * * root cd /path/to/watchlog; sh inotify_cron.sh